How to Design a Subwoofer For Your Vehicle

Note: This post is adapted from an article originally written by Kevin Bennett for MC2 magazine.
Adding a subwoofer is one of the most common audio upgrades. It is also one of the most misunderstood, and most poorly executed.
Look through any aftermarket audio
Proper subwoofer design must account for the listening room (the cabin of the MINI), the actual woofer enclosure, and the speaker itself. Each of these three things is a critical element of the total system. Changing any of the three elements changes the system.
The listening room—in this
The division point between the two is called the Schroeder (or transition)
As the wavelength of sound begins to approach or exceed the dimensions of the room, the
As the wavelength begins to exceed the room dimensions the wave can no longer fully form and begins to be rejected back into the room, interacting with itself.
I’m going to skip the physics and just give you the upshot, which is this: below the transition frequency, low frequencies start to get a boost that increases as frequency decreases. This is called cavity effect, also commonly known as cabin gain.
The transition frequency, and the shape and slope (amount) of the cabin
In most
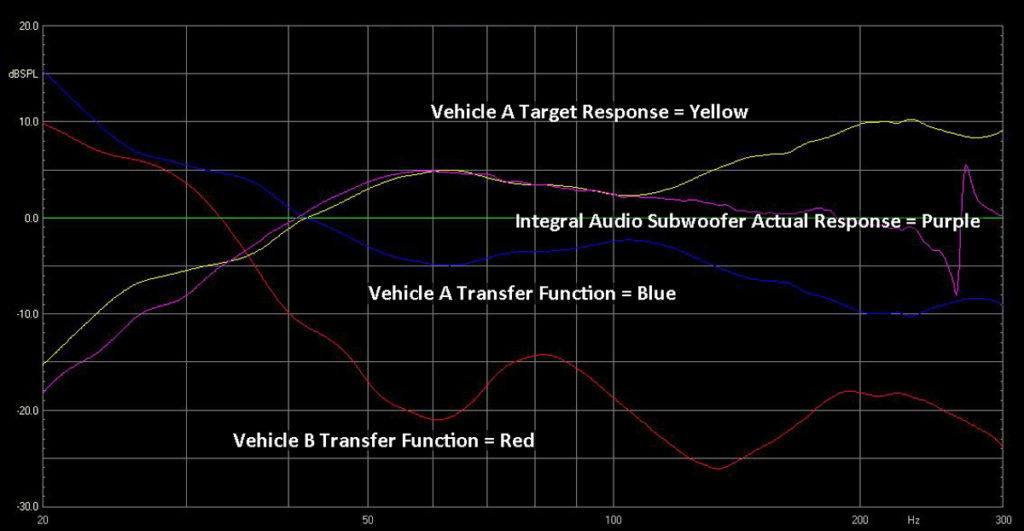
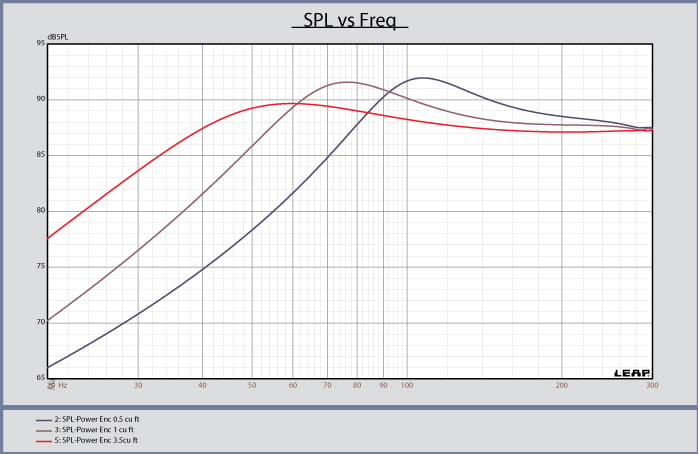
Take a look at Figure 1. The red line is the transfer function of a small hatchback, and the blue is
The hatchback transfer function is also much more uneven—the peak at 80Hz and the null at 60Hz are related to the
It also means that if you tried to use the subwoofer from Vehicle A in Vehicle B, the frequency response would change by the difference between the red and blue curves. So a subwoofer with good response in Vehicle A would have a 15dB hole at 60Hz in Vehicle B.
A speaker is a complex electro-mechanical device, and one model of
These properties—quantified as Thiele/Small parameters—are what determine how a particular speaker will sound in an enclosure. The enclosure is a critical part of this. Change the size of the enclosure, and you change the response of the speaker/enclosure system. This is because the amount of air in the enclosure acts as a major element of the speaker’s suspension. In a smaller enclosure, the reduced amount of air compresses faster and begins to exert a restorative force pushing back on the woofer sooner, essentially becoming a more “springy” suspension.
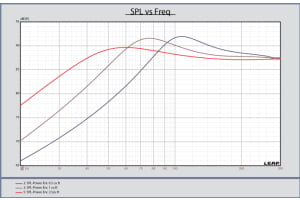
The opposite is true of a larger enclosure. Take a look at Figure 2. This is the
What you’re probably already noticing is that the frequency responses of the speaker/enclosure systems from Figure 2 are shaped roughly opposite that of the vehicle transfer functions from Figure 1. The key to getting
Take another look at Figure 1. The yellow line is the calculated inverse of the blue line (Vehicle A’s transfer function). This yellow line is the ideal target response for a subwoofer for Vehicle A—it is the response that, when added to the vehicle’s transfer function, will yield a perfectly flat response.
The purple line is the actual measured acoustic response of the subwoofer we designed for the vehicle. Look how closely the actual subwoofer response tracks the ideal response [remember that for a subwoofer we are only interested in the area below 100Hz].
Now that you know all this, how can it help you? I’ll be honest here—without sophisticated measurement tools and expertise you aren’t going to be able to achieve results like the above on your own. Accurately measuring the vehicle’s transfer function is extremely difficult. We do it using our own proprietary method and software that we’ve developed.
We also have the ability to change the speaker parameters, whereas, the general aftermarket is limited to off-the-shelf drivers. But if you have some technical skills and a desire to DIY, you can certainly do better than the car audio shop down the road, which likely don’t know their elbow from a transfer function.
There are lots of free and low-cost tools like WinISD, Liberty Audiosuite, and ARTA, to name a few, that you can use to help you get a rough measure of your vehicle’s transfer function and model speaker/enclosure response [Tip: take multiple measurements and average them or your results won’t make sense].
Unless you are a very experienced hob-
byist, however, you may not want to mess with them. All too
often I see folks who have been lulled into a false sense of
security by the impressively-precise looking output of the
tools, and never realize that they’ve made an error some-
where along the way.
So where does that leave everyone else? When at all possible, listen to a subwoofer system in your vehicle before deciding. Check for significant problems by listening with a test tone disk: with the volume at a fixed- level, start at 20Hz and go up, listening for relative changes in volume from one frequency to the next.
Even making a chart of the relative perceived differences can give you a rough approximation of the graphs above. If you are getting too much
How to Design a Subwoofer For Your Vehicle
Note: This post is adapted from an article originally written by Kevin Bennett for MC2 magazine.
Our Subwoofers
-
![SoundstageDSP™ Ultra for BMW 3 & 4 series [F30, F32, F36] & M3/M4 [F80/F82]](https://integralaudio.com/media/catalog/product/cache/20601a6ee8d62a4d3010fd8b033abef4/s/o/soundstagedsp_ultra_full_041_1.jpg) SoundstageDSP™ Ultra for BMW 3 & 4 series [F30, F32, F36] & M3/M4 [F80/F82]$4,499.00
SoundstageDSP™ Ultra for BMW 3 & 4 series [F30, F32, F36] & M3/M4 [F80/F82]$4,499.00SAVE $925.00
$3,574.00
![Soundstage™ Elements for BMW 3 & 4 series [F30/F31/F32/F33/F36] M3 & M4 [F80/F82/F83]](https://integralaudio.com/media/catalog/product/cache/20601a6ee8d62a4d3010fd8b033abef4/i/n/integral-audio-elements-f3x--2.jpg)
![Soundstage™ Elements for BMW 2-series [F22 & F23] & M2 [F87]](https://integralaudio.com/media/catalog/product/cache/20601a6ee8d62a4d3010fd8b033abef4/i/n/integral-audio-elements-f2x-1.jpg)